Introduction to the COBie Platform and COBie-US Resources Extension
The COBie Platform and COBie-US Resources extensions verify and validate COBie information within your model, based on US requirements, as well as exporting this validated information into a COBie XLSX spreadsheet. This article provides an introduction to those who haven’t used these extensions before in Solibri Model Checker (SMC).
The file COBieChallenge2014_Arch+MEPFinalA_optimized.zip used in this example is available to download through the following link:
COBieChallenge2014_Arch+MEPFinalA_optimized.zip
This file is an IFC exported from Revit 2014 of the Native BIM File provided by Autodesk for the January 2014 buildingSMART alliance Challenge. Information on this can be found here:
January 2014 bSa Challenge: Autodesk
COBie information was populated in the model using the COBie Extension for Revit. Information on this extension as well as the download can be found here: BIM Interoperability
If you would like to follow along with the steps in this article and haven’t already installed the COBie Platform and COBie-US Resources extensions, please see the article Installing the COBie Platform and COBie Resources Extensions
SETTING THE ROLE FOR COBIE
There are many resources required in order to validate your COBie information and generate your COBie spreadsheets within SMC. The roles included in the COBie-US Resources extension link to those resources in order to automatically load the correct ones based on your requirements of COBie.
- Open SMC
- Click File > Settings > General and check if the Show Role Selection checkbox is marked. If it is not marked, mark the checkbox, close, and reopen SMC to enable the Role Selection wizard.
- Click File > Open and open COBieChallenge2014_Arch+MEPFinalA_optimized.zip.
- In the Ensure Model Disciplines dialog that opens, select Architectural, and click OK.
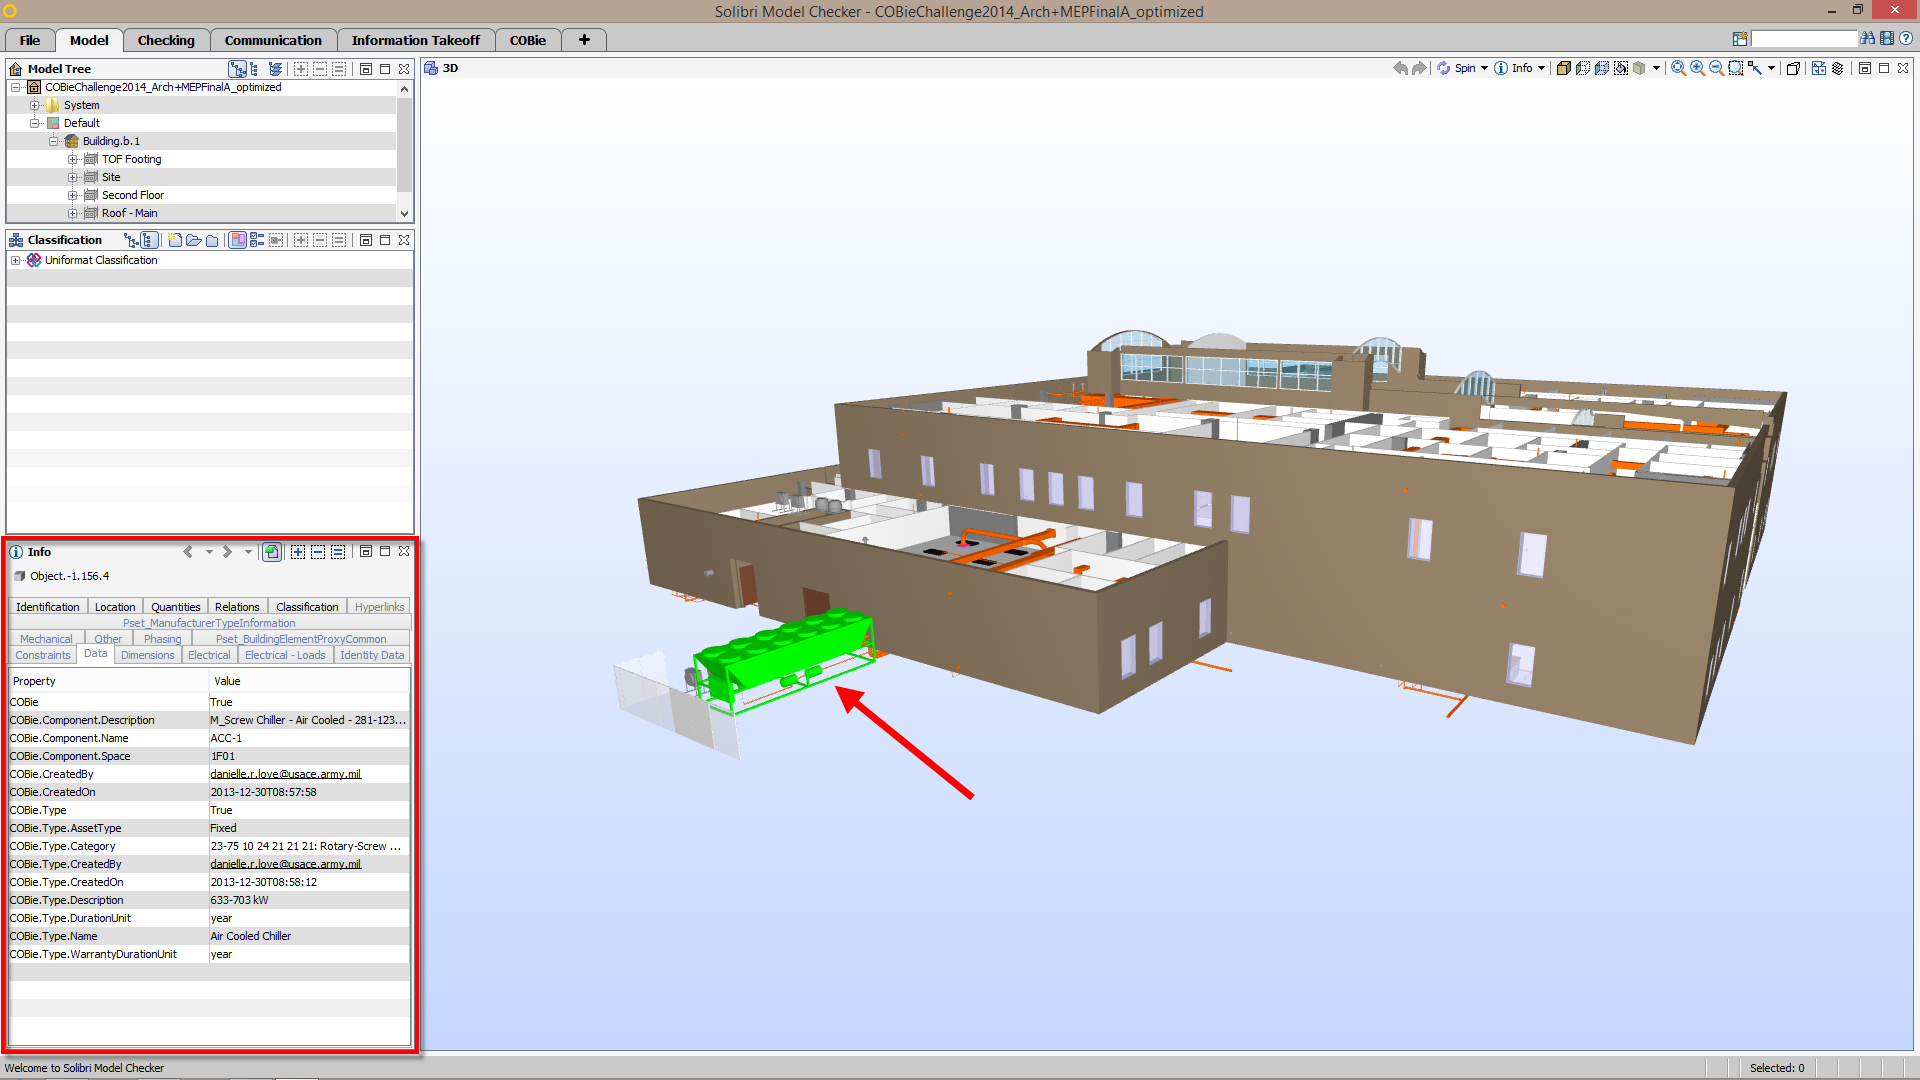
Medical Clinic model with COBie information populate using the COBie Extension for Revit
The 3D View displays a medical clinic that includes both architectural and MEP components. The structural model wasn’t included in this combined model, which is why the model is missing roofs and slabs. If you select one of the components using the Info Tool, such as the chiller in the image above, the Data tab of the Info View lists COBie information that was populated using the COBie extension for Revit. - Click the Checking Layout tab and the Please Choose a Role dialog will open. Mark the COBie-US OmniClass 2006 role and click Next.
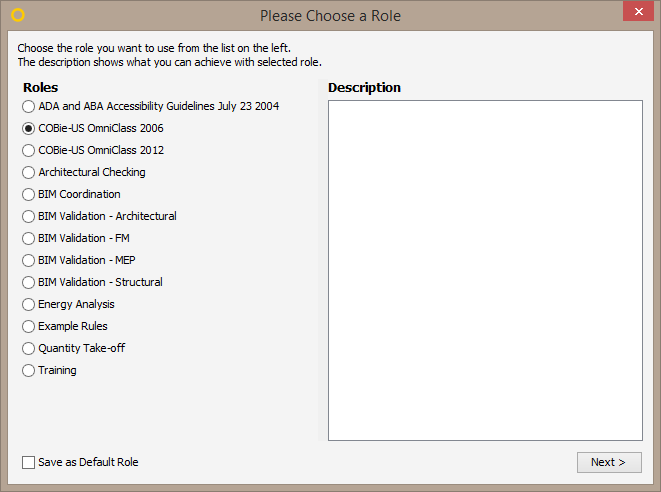
Selecting the COBie-US OmniClass 2006 Role - Leave all three rulesets selected and click OK to open the rulesets along with the default classifications and ITO definitions associated with the role.

Rulesets from the COBie-US OmniClass 2006 Role
COBie uses a classification system to categorize a facility, space, element, and product, which correspond to items listed in the Facility, Space, System, and Type sheets respectively. This role opens the Rulesets, Classifications, and ITO definitions associated with the US requirements for COBie using the 2006 version of the OmniClass classification system for the categorization of components in the model. OmniClass is a hierarchical classification system that uses numeric codes to classify items. These classification tables were released in 2006 and updated in 2012 with different numeric codes, which is why there is a 2006 and 2012 listing in the role selection dialog. This example model uses codes that were released in 2006, which is why the role was set to COBie-US OmniClass 2006. More information on OmniClass can be found here: http://www.omniclass.org/
CLASSIFICATION – MAP TO COBIE DATA WITHIN THE MODEL
There are over 60 classifications included in the COBie-US Resources extension. Most of these classifications are simply mappings to the locations where COBie information will likely reside in a model. Some also classify objects based on values being valid and from the PickList worksheet of the COBie spreadsheet. These classifications are used in rulesets to ensure that the COBie information is present and valid. Also, these classifications are used to populate the COBie spreadsheet.
- Click the Model Layout tab
- Click the Add View button and select Classification if the Classification View isn’t already open.
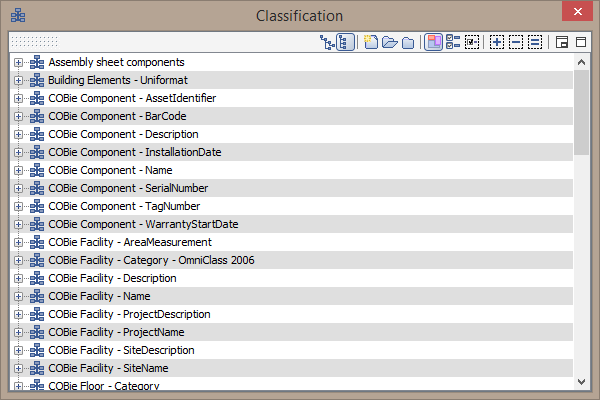
COBie-US OmniClass 2006 Classifications - In the Classification View, scroll down the list to find the classification COBie Type – ModelNumber and expand this classification.
-
Double click the 250-150000 classification, expand the classification, and select the components that have been classified with this Model Number. The camera in the 3D View should zoom to the 3 paper towel dispensers that have this model number. In the Data tab of the Info View, you’ll find a property with the name COBie.Type.ModelNumber that has a value 250-150000
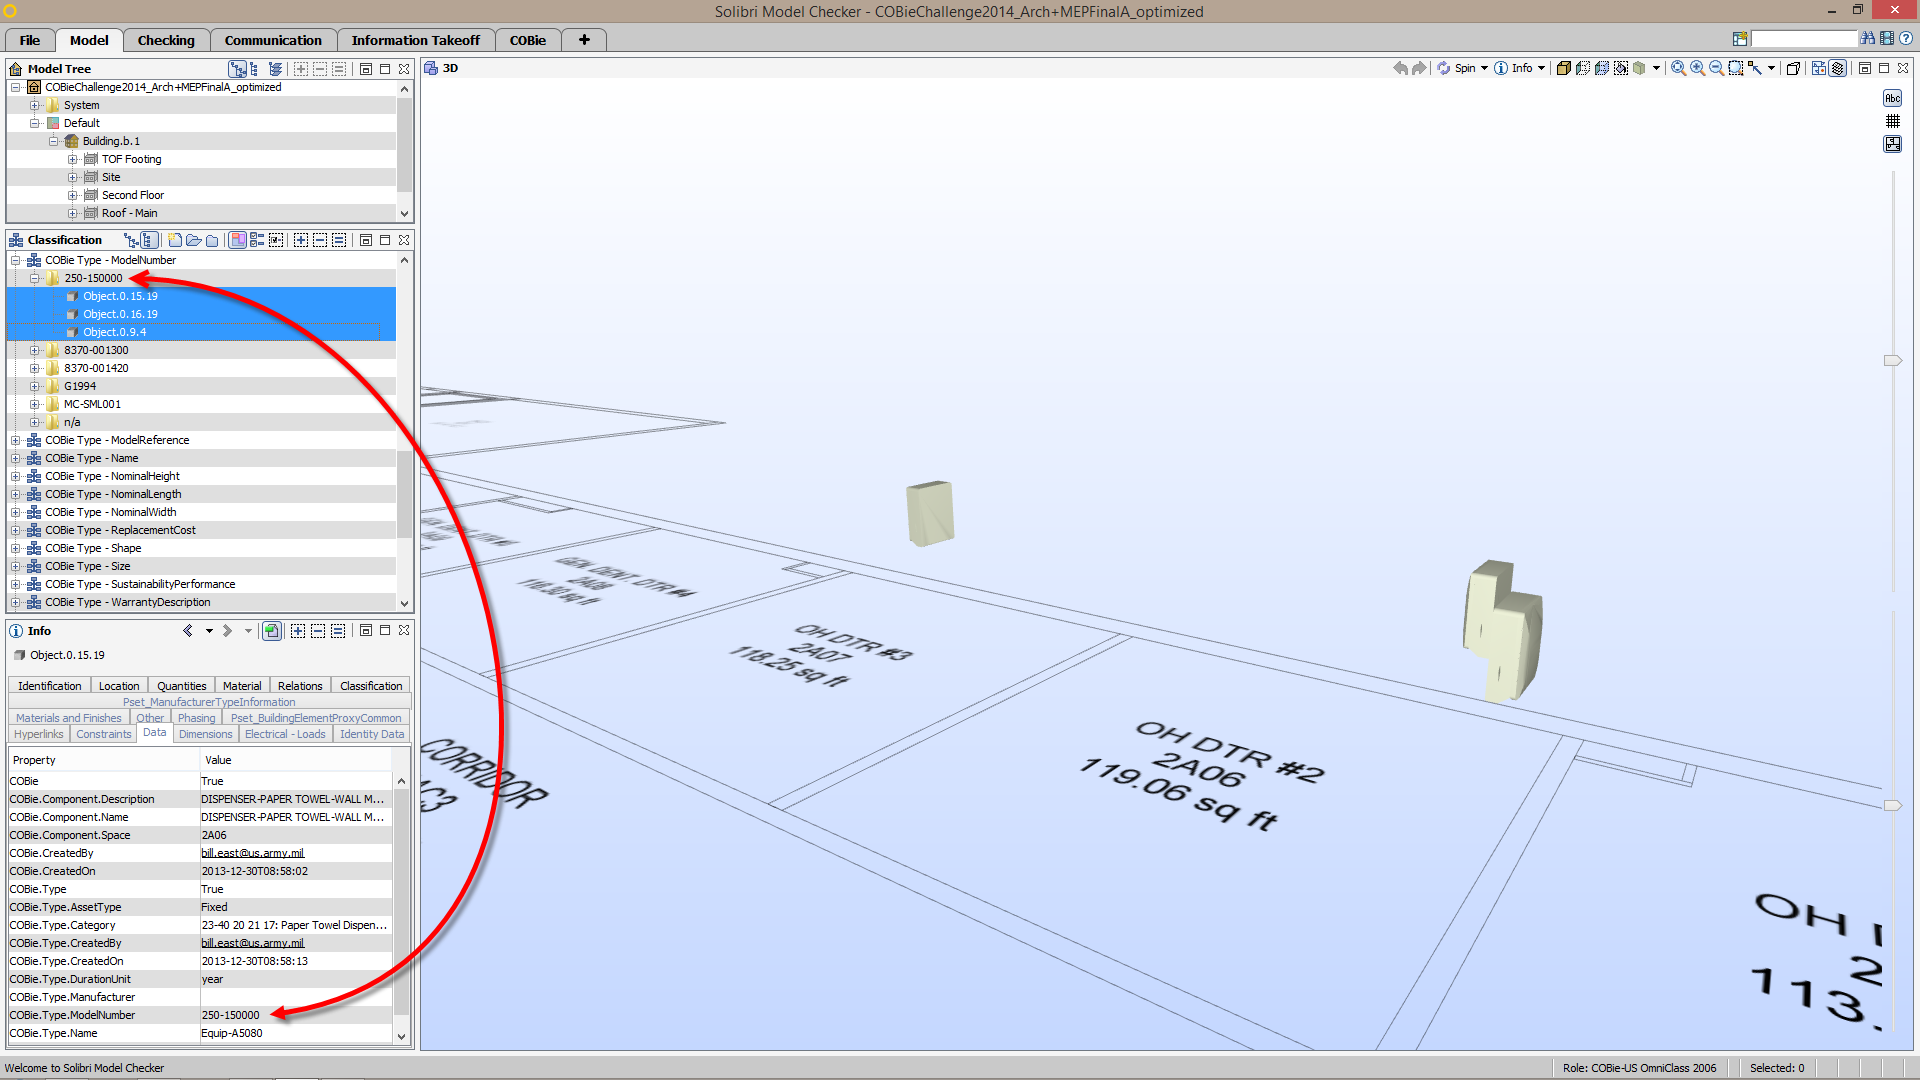
Components Classified as the ModelNumber 250-150000 - Select the COBie Type – ModelNumber classification and click the Classification Settings button.
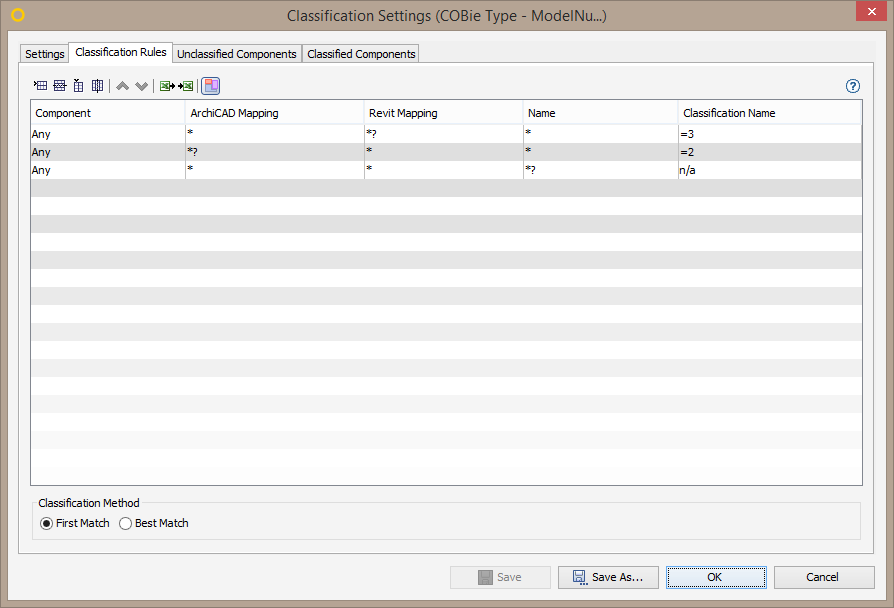
COBie Type – ModelNumber – Classification Rules
In the Classification Rules table, either the wildcard matching characters * or ?* are listed in the cells of the ArchiCAD Mapping, Revit Mapping, and Name columns. Also, =3, =2, and n/a are listed in the cells of the Classification Name column. The Classification Method is set to First Match; therefore, the first row checks a component to see if there is a value present in the location from the Revit Mapping column using the ?* wildcard matching characters. If so, that value from the third column is set as the classification name for the component, using the value =3 in the Classification Name column. If no value exists in the location from the RevitMapping column, the second row checks if a value exists from the ArchiCADMapping column. If so, the classification rule sets the classification name of the component to that value from the ArchiCAD Mapping column. If no value exists in either location, the third row checks if a Name exists for the component, and if there is, sets the classification name of the component to N/A, since no model number exists for the component. - Double click the Revit Mapping column header.
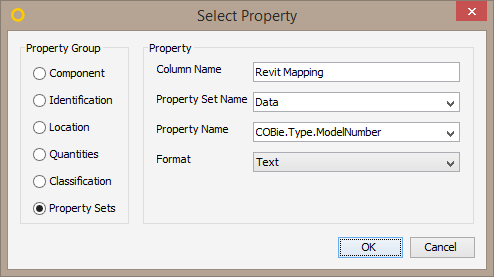
Revit Mapping for COBie Type – Model Number
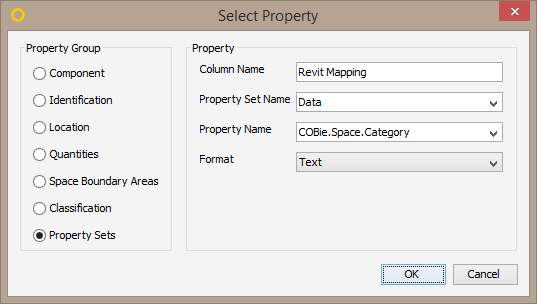
In the Select Property dialog, the property set location is the property name COBie.Type.ModelNumber from the property set Data. This is the same location previously noted in the Info View and the location that the COBie Extension for Revit places this specific COBie property for components in a model. - Double click the ArchiCAD Mapping column header.
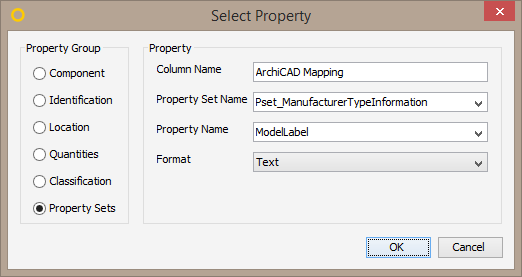
ArchiCAD Mapping for COBie Type – Model Number
In the Select Property dialog, the property set location is the property name ModelLabel from the property set Pset_ManufacturerTypeInformation. This is the location specified in the GRAPHISOFT ArchiCAD and COBie 2 document, which bases the location on the COBie – IFC Mapping rules found in the Responsibility Matrix Version 17 document. These documents can be found online in the links below:
- GRAPHISOFT ArchiCAD and COBie 2
- COBie Responsibility Matrix
Whether using ArchiCAD or Revit, this classification should map to the location of the ModelNumber COBie property in your IFC model. If your model uses a different location than these, you are able to add an additional column for that location of the property and add an additional row to the top of the classification rules to map the classification name of components to that location.
NOTE: More information on these types of mapping classifications can be found in the article: Using Advanced Classification in ITO - In the Classification View, scroll to, expand and select the COBie Space – Category – OmniClass 2006 > 13-15 11 34 11: Office Classification.
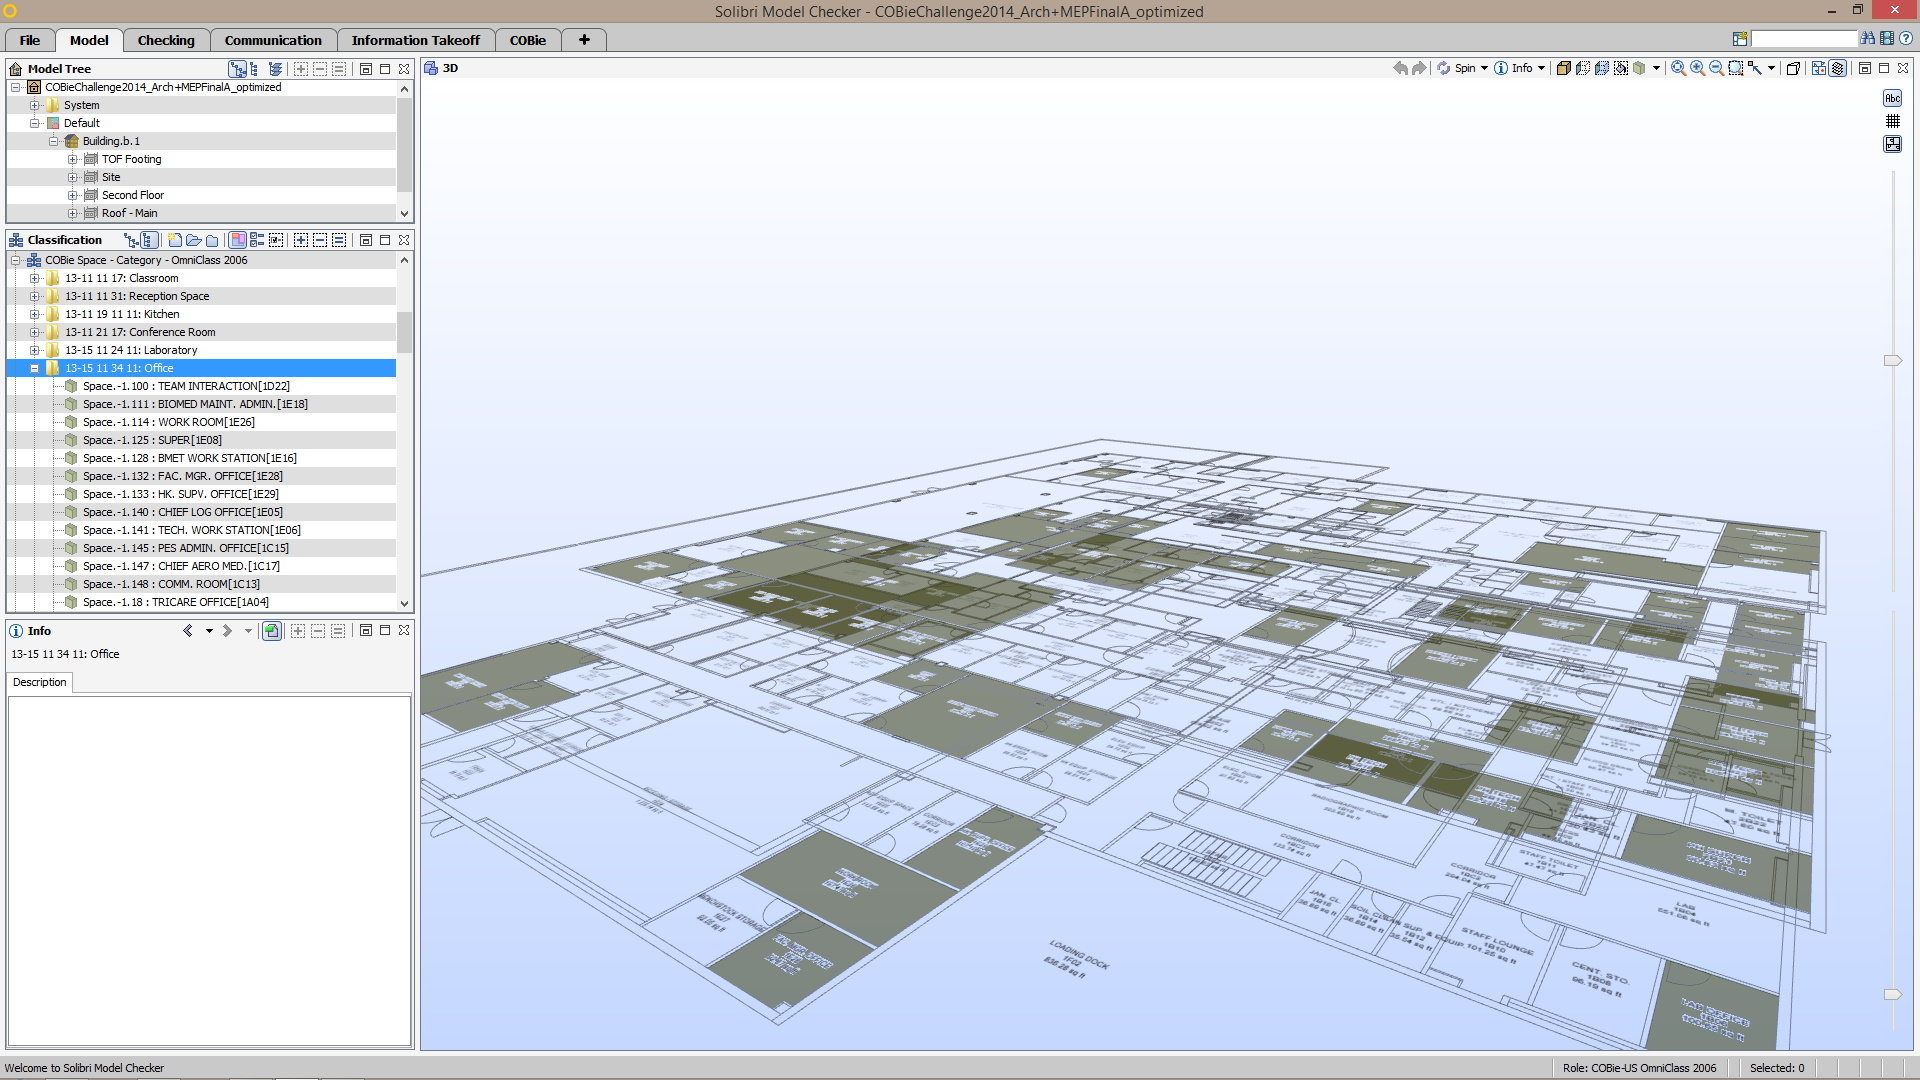
Rooms Classified as 13-15 11 34 11: Office
In the 3D View, all rooms that are classified as offices through the use of an OmniClass 2006 classification code are isolated and colored grey. - With the COBie Space – Category – OmniClass 2006 classification selected, click the Classification Settings button.
In the listing of classification rules, there is a row that maps a value 13?15?11?34?11* from the location specified in the Revit Mapping column to the classification name 13-15 11 34 11: Office. Since OmniClass codes may use a notation that separates the digits with periods (e.g 13.15.11.34.11), the question mark (?)wildcard matching character is used. So long as there is a single character, which could be a space, dash (-), or period (.), this wildcard matches that character. There is an asterisks (*) at the end of the code since the code may include the description (e.g. 13-15 11 34 11: Office). More information on these wildcard matching characters used in classification can be found in the article: Creating Classifications in SMC - Double-click the Revit Mapping column header.
Revit Mapping for COBie Space – Category OmniClass 2006
In the Select Property dialog, the property location is the property name COBie.Space.Category from the property set Data. This is the property location that the COBie Extension for Revit places the Category COBie property for spaces in a model.
NOTE: If you double-click the ArchiCAD Mapping column, it maps to a random classification that currently exists in this model, since the classification it is supposed to map to doesn’t exist in this model. However, if you open an IFC exported from ArchiCAD that was created using the processes outlined in the GRAPHISOFT ArchiCAD and COBie 2 document, this column maps to the OCCS – Space by Function classification, which is an IFC Classification that is included in the IFC model.
RULESETS – VERIFY COBIE INFORMATION WITHIN THE MODEL
Both the COBie-US OmniClass 2006 and COBie-US OmniClass 2012 roles include three default rulesets to verify/validate that the COBie information in the model exists, by checking that a property exists and a value is defined for it. In addition, these rulesets also have the ability to check that the value of the properties are valid, by checking that the value is one of those that exists in the PickList worksheet of the COBie spreadsheet, or that the value is unique where required:
- COBie Extension for Revit: This Ruleset verifies that COBie properties have been defined in an IFC exported from Revit 2014 or later using the COBie Extension for Revit.
- Responsibility Matrix Version 17: This Ruleset verifies that COBie properties have been defined in a model based on the COBie – IFC mapping rule Responsibility Matrix version 17.
- COBie-US Property Verification: This Ruleset verifies that COBie properties have been defined in a model either through the COBie extension for Revit or based on the COBie – IFC mapping rule Responsibility Matrix version 17.
NOTE: Since the locations of COBie properties differ between the COBie Extension for Revit and Responsibility Matrix Version 17, if you are using the COBie Extension for Revit, it is recommended that you open the COBie Extension for Revit ruleset in SMC, and not the Responsibility Matrix Version 17 ruleset. Likewise, if you are populating your COBie information based on IFC Mapping Rules of the Responsibility Matrix Version 17 document, it is recommended that you open the Responsibility Matrix Version 17 ruleset, and not the COBie Extension for Revit ruleset. However, the COBie-US Property Verification checks COBie information using the COBie mapping classifications mentioned in the previous section, and should be opened in either case.
- Click the Checking Layout tab.
- In the Checking View, click the Check button.
- Expand the COBie Extension for Revit > Space ruleset and select the rule COBie.Space.Category.
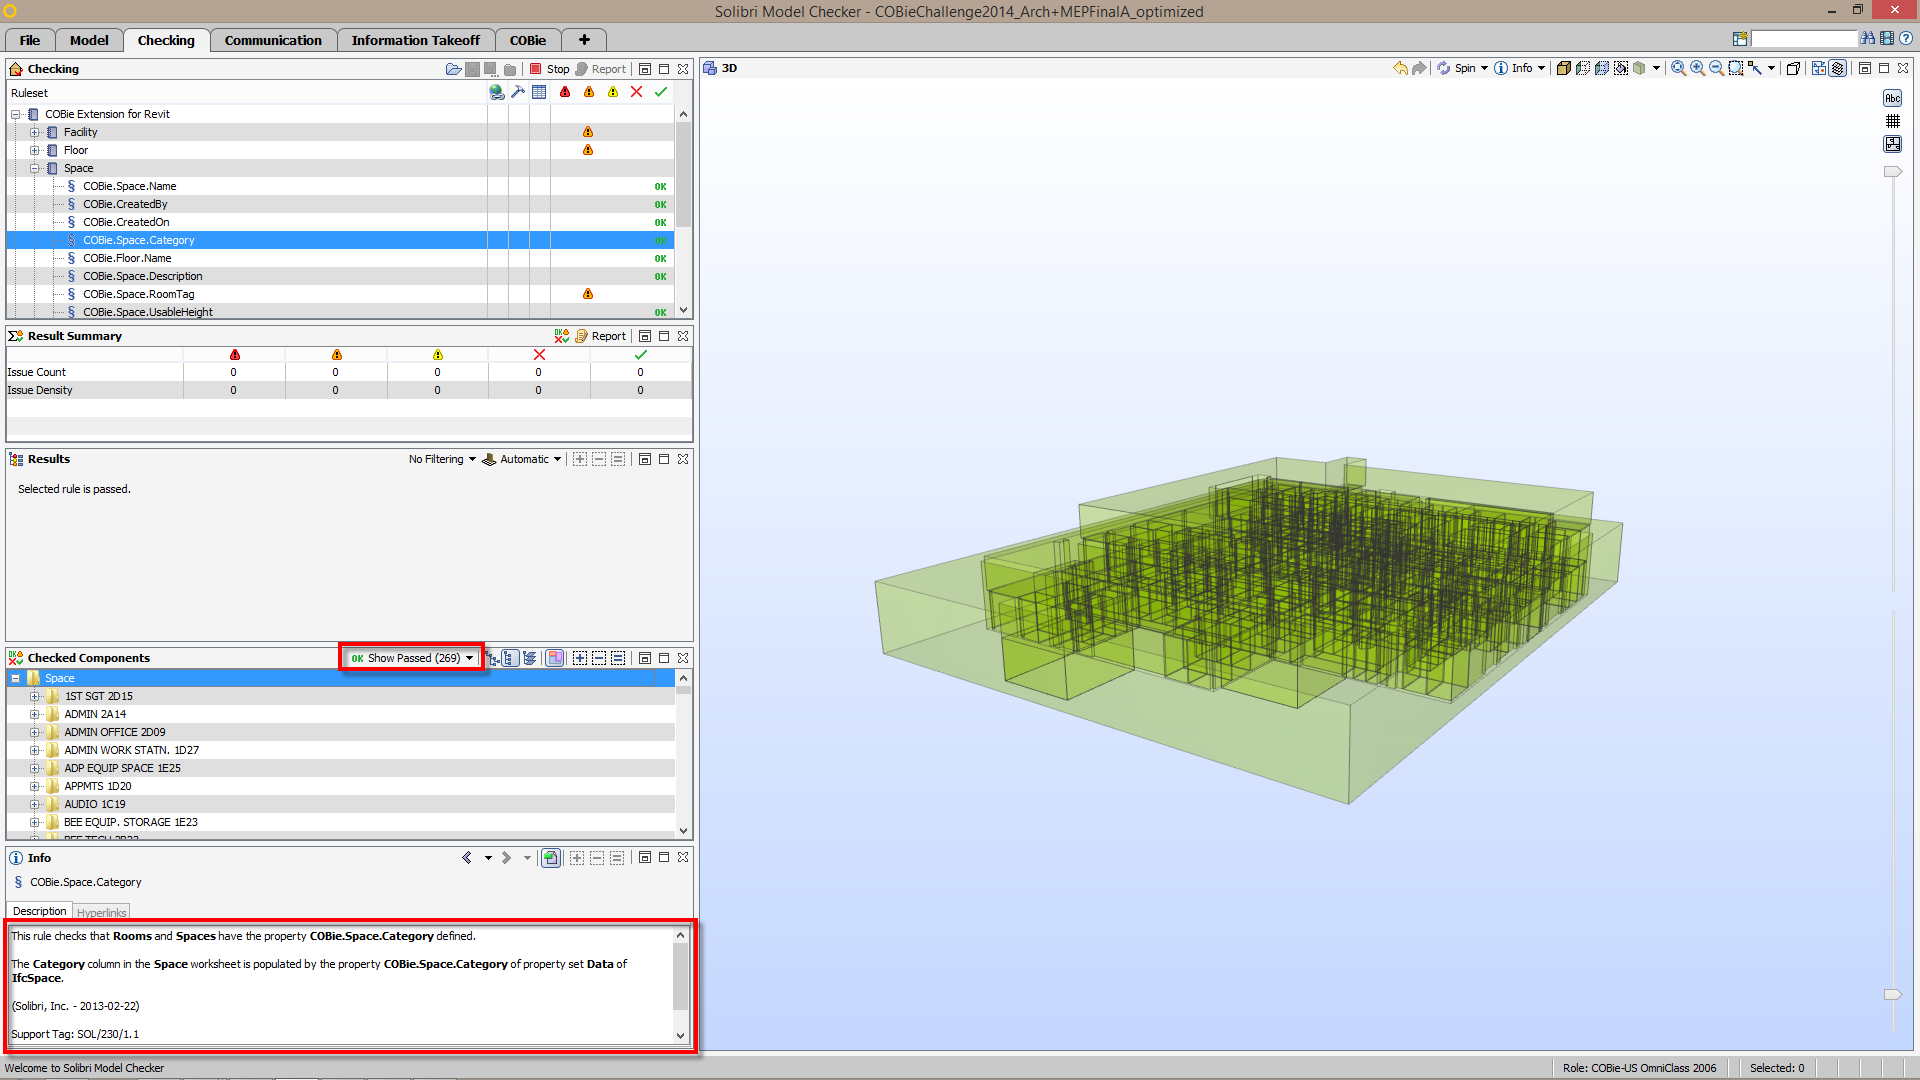
COBie Extension for Revit > Space > COBie.Space.Category Results
This rule passes without any results since all 269 rooms in this model have a space category defined in the property COBie.Space.Category of the property set Data. In the Checked Components View, you can verify all 269 spaces in the model were checked and passed the check of this rule. In the Info View, the description of the rule states where this COBie property resides in a model that was created using the COBie Extension for Revit. - In the Checking View, expand the COBie Extension for Revit > Type ruleset and select the rule COBie.Type.ModelNumber.
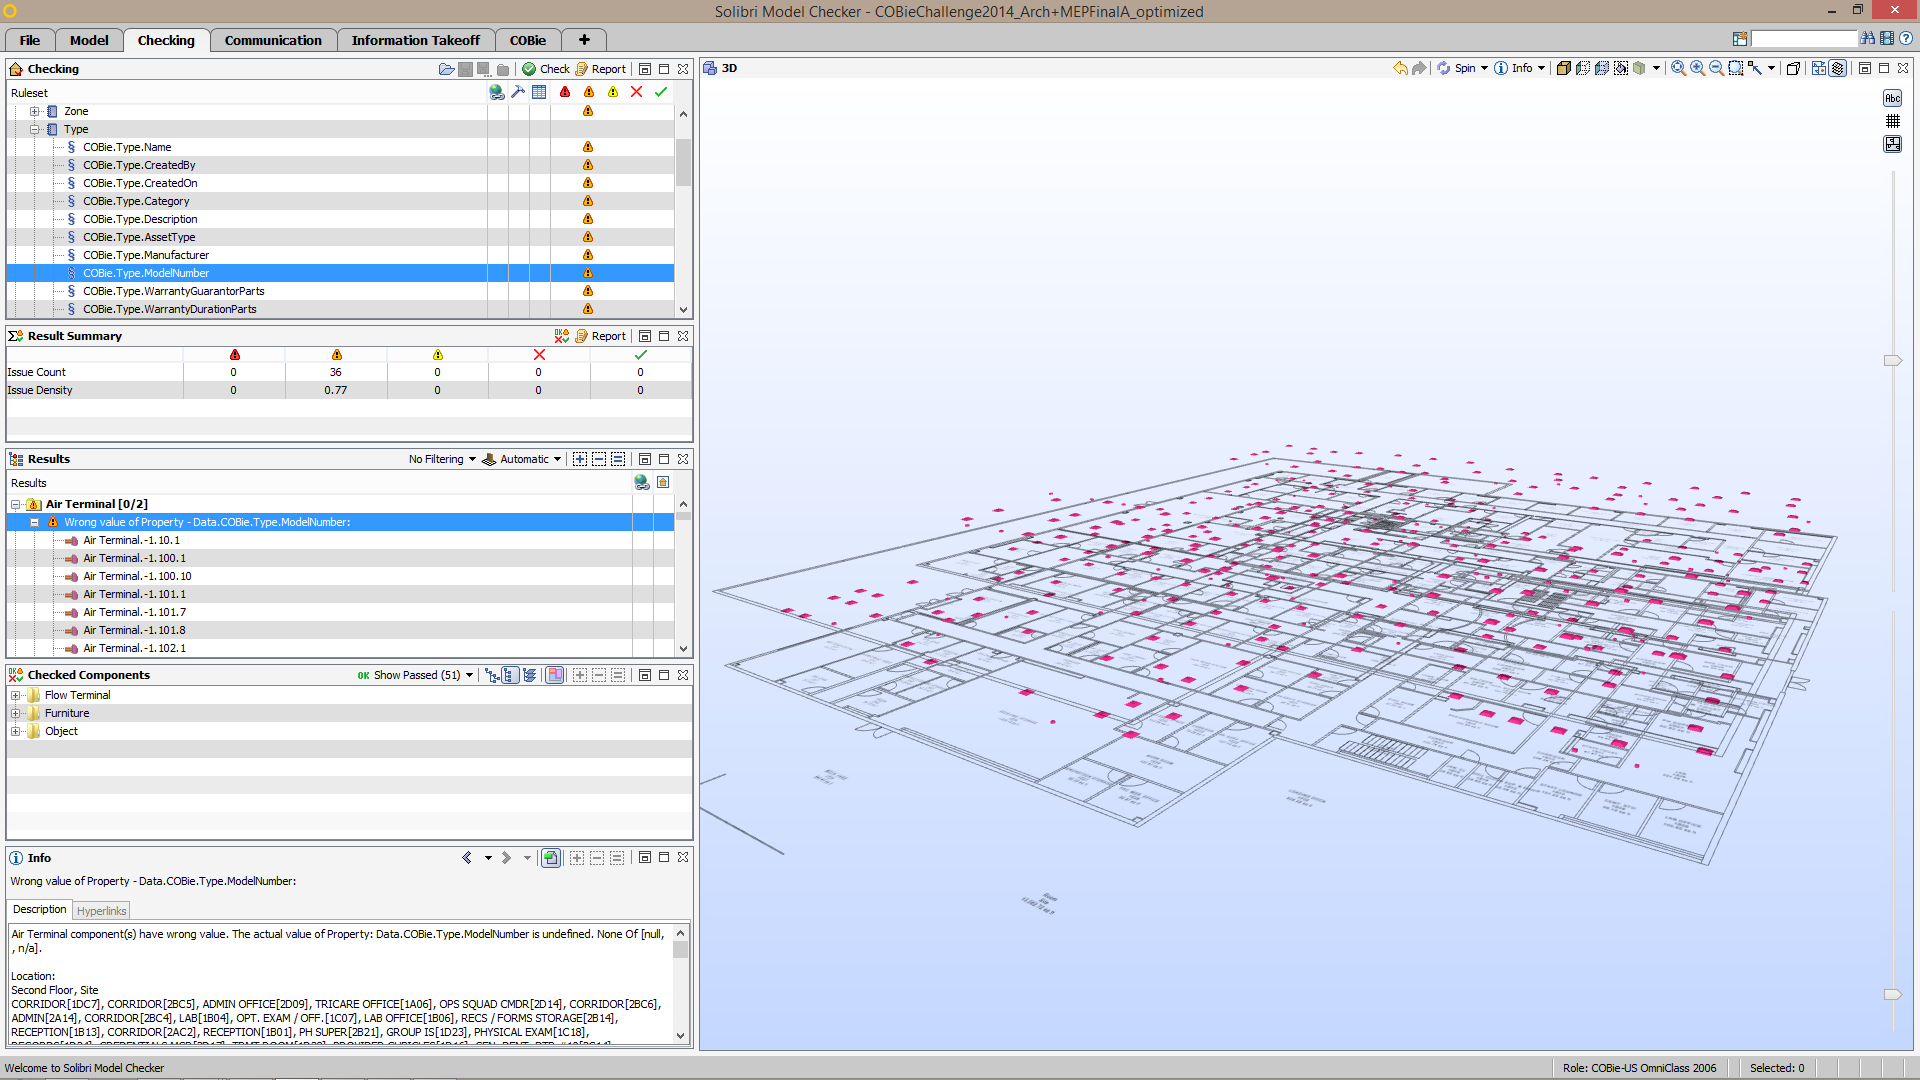
COBie Extension for Revit > Type > COBie.Type.ModelNumber – Results
In the Results View, results are grouped by the component type of the components that are missing a ModelNumber value in the COBie.Type.ModelNumber property of the Data property set. For example, none of the Air Terminals in this model have a Model Number. In the Checked Components View, 51 components in the model are shown as passing this check, as those components have a value defined in the Data.COBie.Type.ModelNumber property - In the Checking View, expand the Responsibility Matrix Version 17 (OmniClass 2006) > Type ruleset and select the rule [ModelNumber]: Is defined for Types.
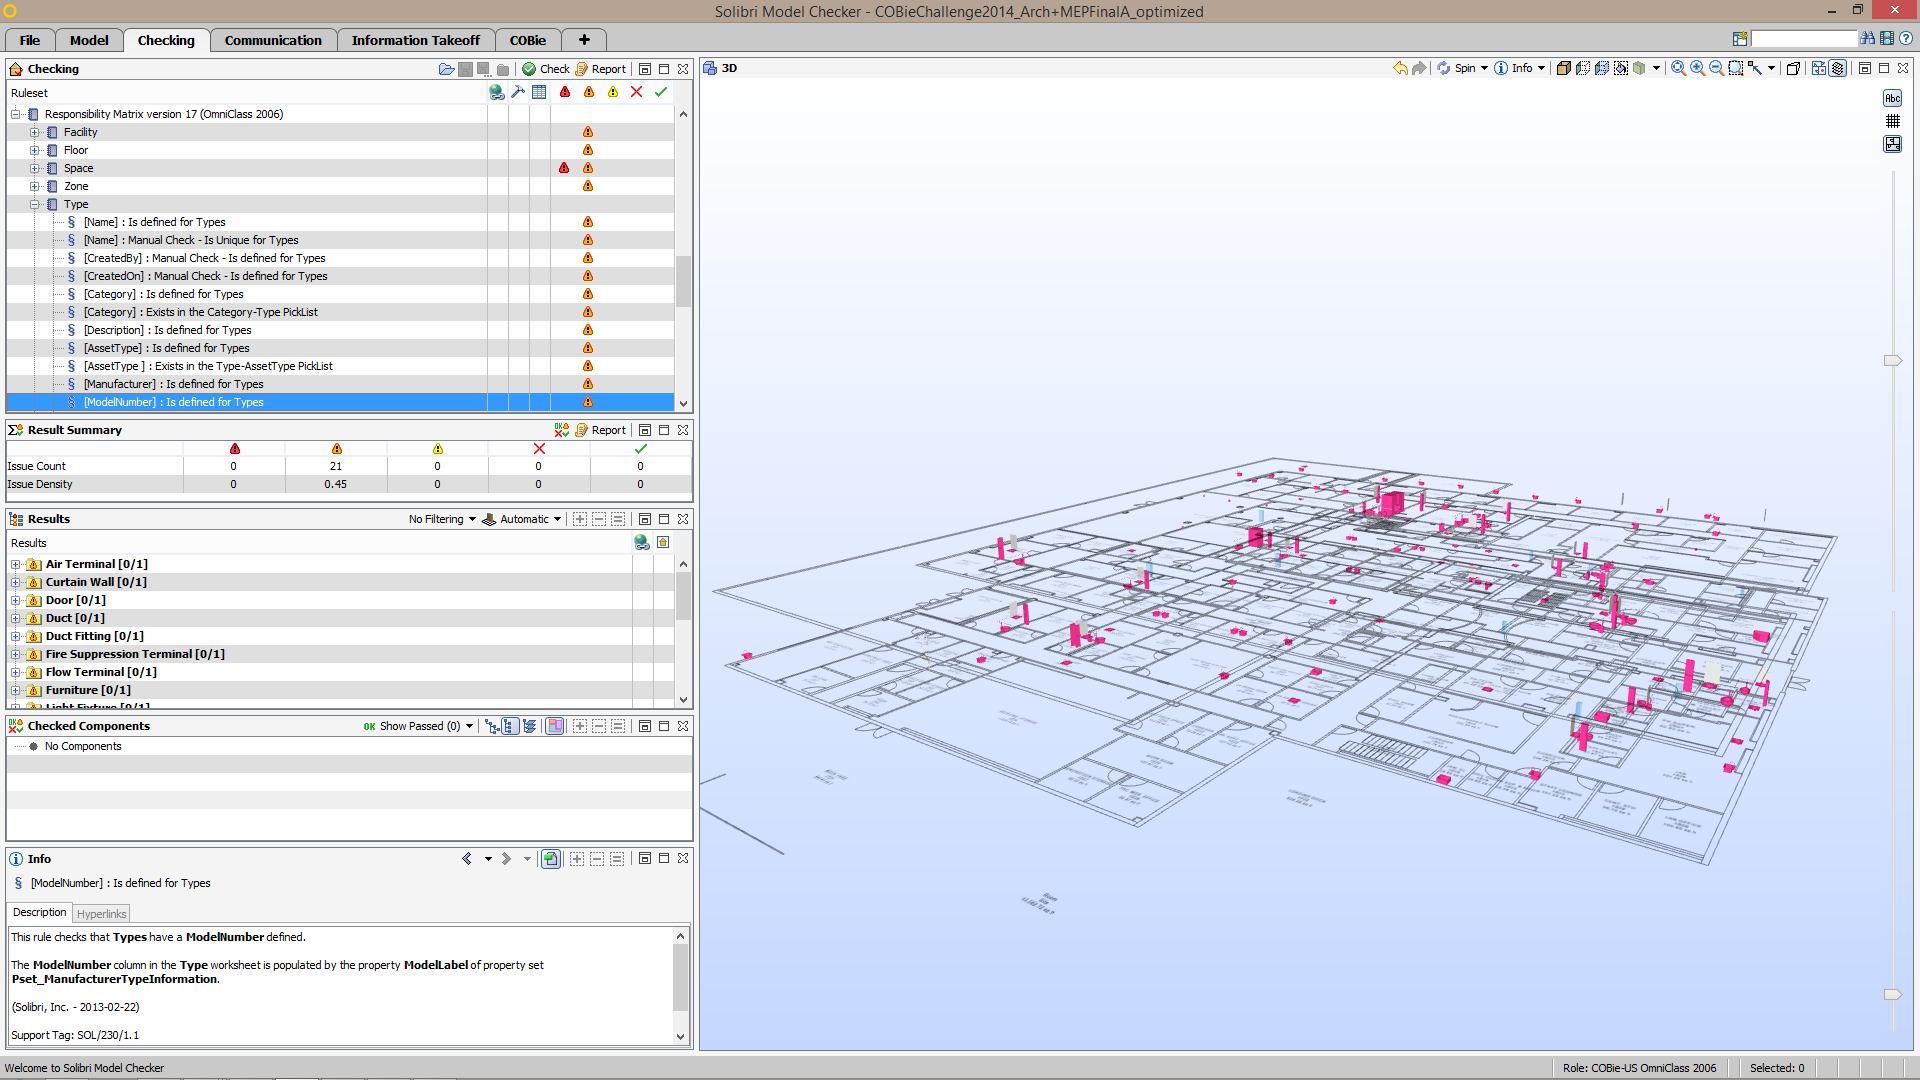
Responsibility Matrix Version 17 (OmniClass 2006) > Type > [ModelNumber] is defined for Types – Results
In the Results View, all components have failed this check, including the 51 components that passed the previously mentioned check, since the COBieExtension for Revit populates the property Data.COBie.Type.ModelNumber, rather than the property Pset_ManufacturerTypeInformation.ModelLabel as defined in the Responsibility Matrix Version 17 document. - In the Checking View, expand the COBie-US Property Verification (OmniClass 2006) > Type ruleset and select the rule [AssetType] Exists in the Type-AssetType PickList.

[AssetType] : Exists in the Type-AssetType PickList
In Picklist sheet of the COBie spreadsheet, the AssetType column lists only Fixed or Moveable as acceptable values for the AssetType property in the Type sheet.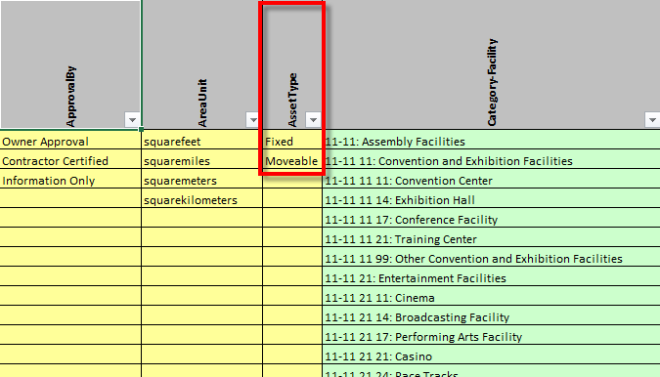
COBie – PickList – AssetType
The rule parameters of this rule ensures that components have one of these two values defined.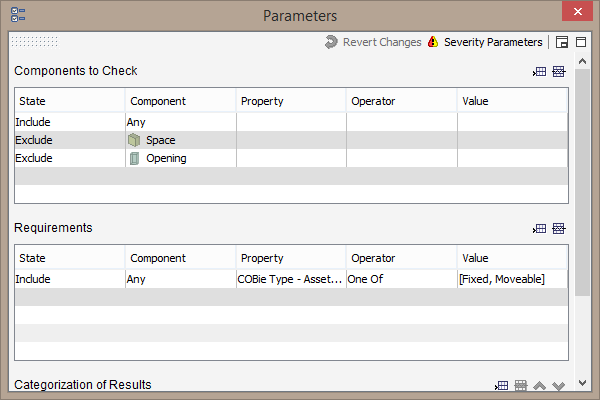
[AssetType] : Exists in the Type-AssetType Picklist – Rule Parameters
In the Results View, one of the doors in this model does not have a value of eitherFixed or Moveable for the COBie property AssetType. This is an example of rules within SMC not only checking that information is populated, but also validating those values based on what is allowed as stated from the Picklist worksheet. - In the Checking View, expand the COBie-US Property Verification (OmniClass 2006) > Space ruleset, right-click the rule [Name] : Is Unique for Spaces, and select Rule Parameters.
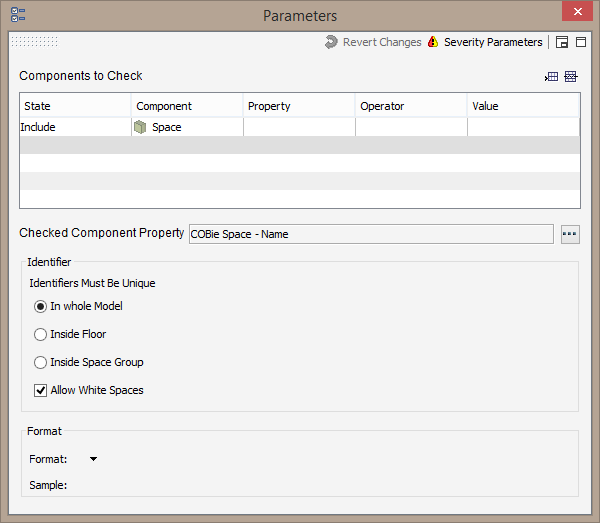
[Name] Is Unique for Spaces
The values in the Name column have to be unique in the Space worksheet of a COBie spreadsheet. The [Name] : Is unique for Spaces rule returns any spaces that don’t have a unique name as results. In addition, if the room numbers in your model are to follow a special naming format (e.g. A104C), you can modify the Format section of the rule parameters with your own requirements. NOTE: The Name column in the Space worksheet is normally populated with room numbers. The room names in a model normally populate the Description column in the Space worksheet.
THE COBIE VIEW: VISUALIZE COBIE INFORMATION WITHIN A MODEL
The COBie View displays COBie information within your model similar to what is seen in a COBie Spreadsheet. In addition, you are able to select the rows within the COBie View to zoom to and isolate the components that correspond to those rows.
- Click the COBie Layout tab.
- Click the Add View button and select Information Takeoff
- Dock the Information Takeoff View above the COBie View. SMC should look similar to the image below:

COBie Layout with the Information Takeoff View added - In the COBie View, click the Click to open COBie Settings… button.
-
In the Open COBie Settings dialog, select COBie – OmniClass 2006.xml from the Resources tab and click Open.
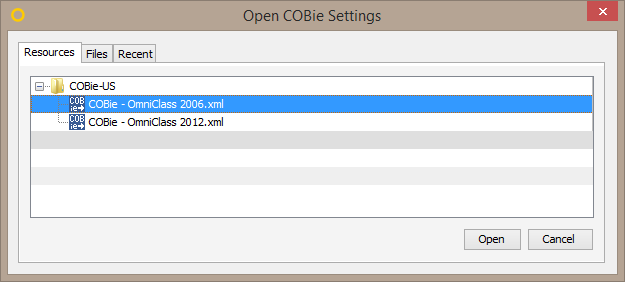
Open COBie Settings dialog - In the COBie View, click the COBie Settings button.
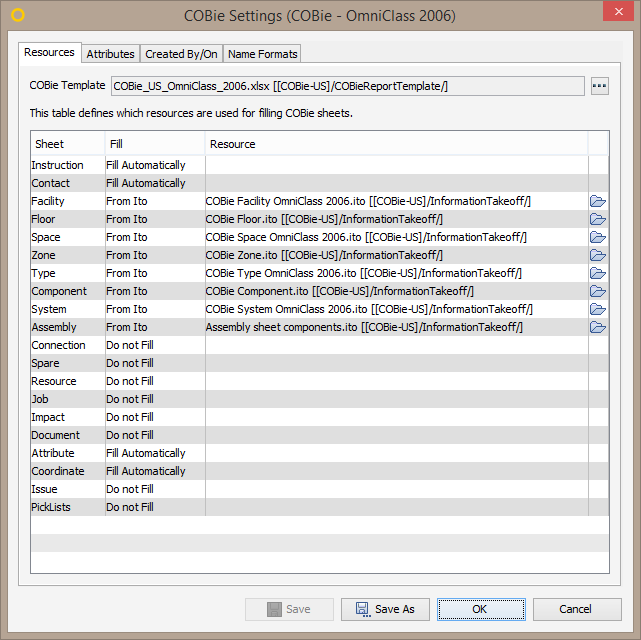
COBie Settings Dialog – Resources
In the Resources table of the COBie Settings dialog, notice the COBie sheets map to ITO definitions in order to populate information within the COBie spreadsheet. - Click the cells that say Fill Automatically in the Fill column for the Attribute and Coordinate sheets and set their values to Do not Fill.

Setting the Attribute and Coordinate sheets to “Do Not Fill”
In order to save time during the population of the COBie spreadsheet, for this example, we leave these sheets unfilled. - Click the Attributes tab of the COBie Settings dialog.
-
In the Included Property Sets tab, multi-select all attributes in the list and click the Exclude -> button to remove them from the list. Click OK.

COBie Settings Dialog – Attributes - In the COBie View, click the Calculate button. SMC will open the ITO definitions that map to the sheets as specified in the COBie Settings dialog, and will begin populating the sheets in the COBie view. You’ll see a progress bar at the bottom of the screen stating that Information Takeoff Definitions are being calculated.
- Click the Component sheet at the bottom of the COBie View.
-
Double click some of the items from the rows listed. For example, in the image below, we double clicked the Towel Dispenser component with the name 100_453335.
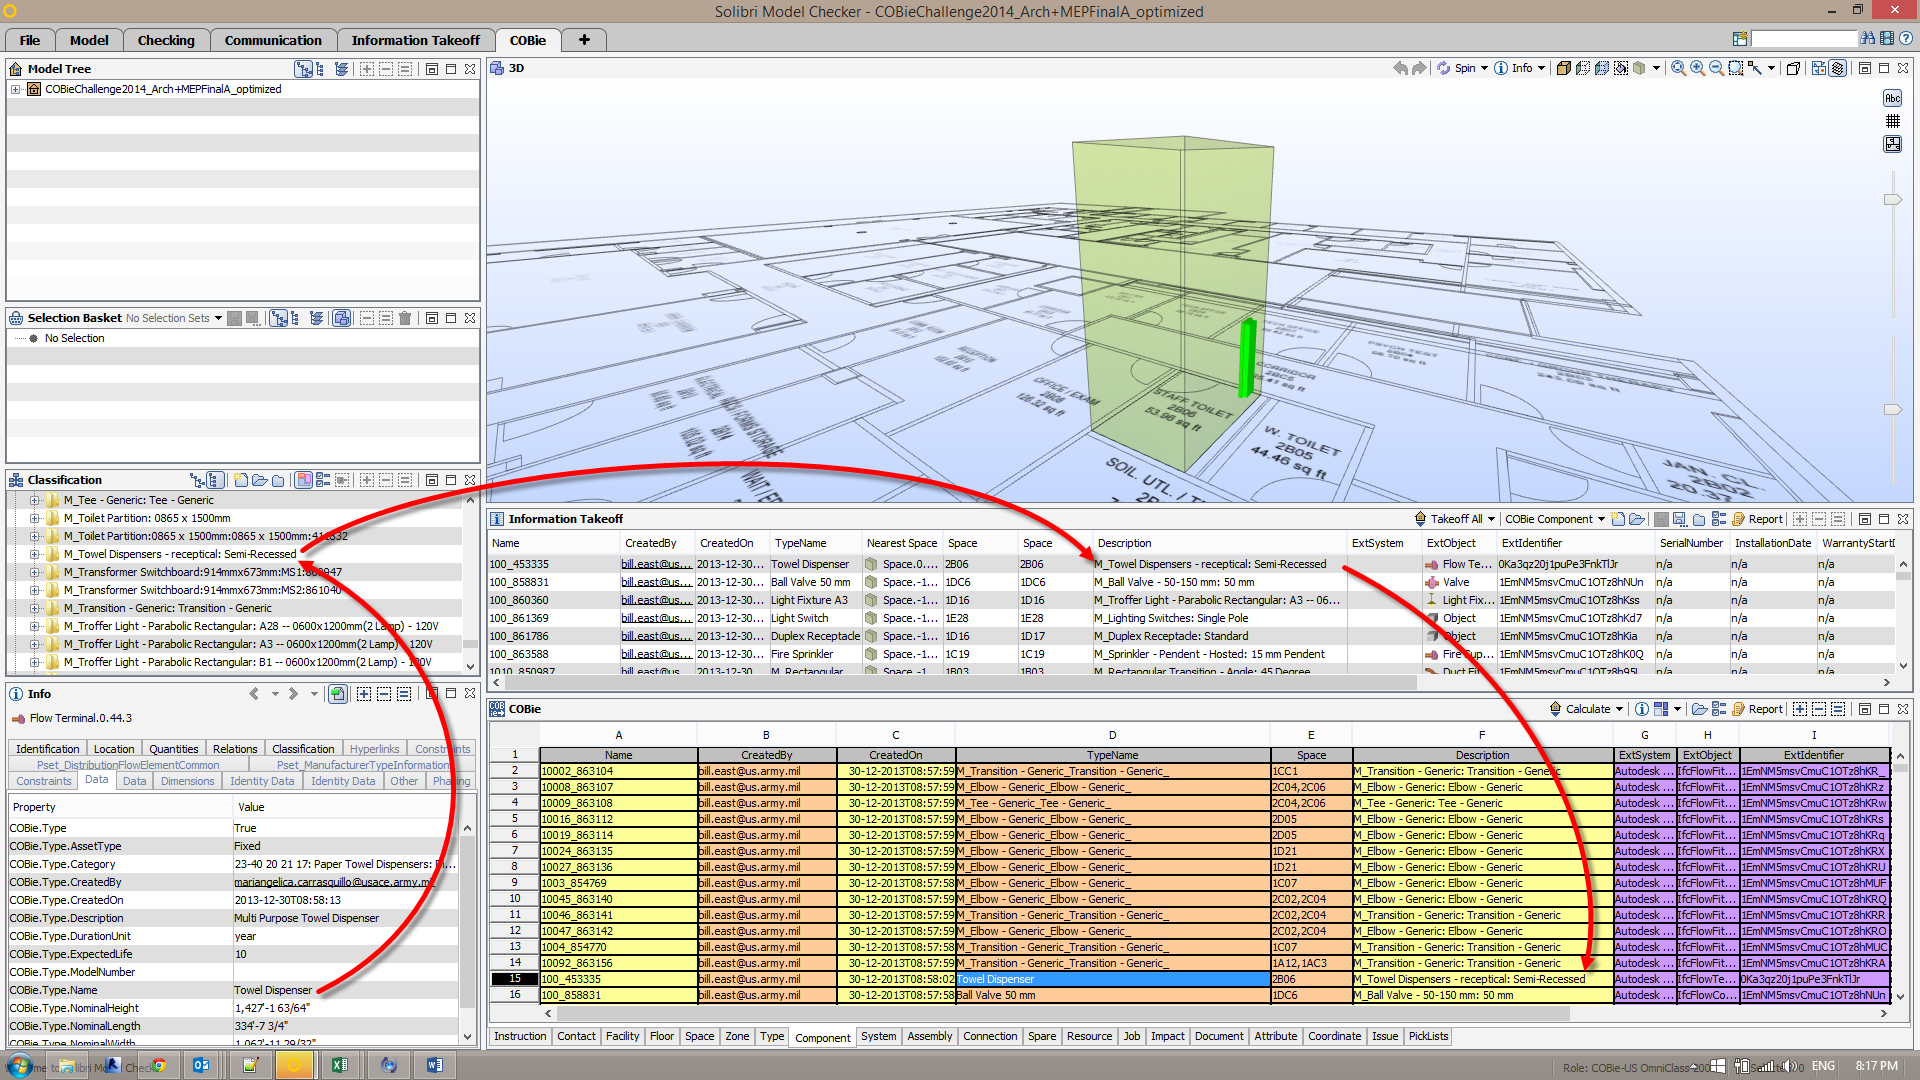
COBie View – Components
Upon double clicking the row, the camera zooms within the 3D view to that component and isolates it along with the space where it resides. This component is also selected with the Info Tool, to view its property information within the Info View.
Notice the red arrows that denote flow of COBie information from the property of the component in the Info View to the cell in a worksheet within the COBie View. The value for the Data.COBie.Component.Description property is the classification name of the component in the COBie Component – Description classification. This classification name is what populates the value in the Description column for the component in the COBie Component ITO definition within the Information Takeoff View. The Component sheet within the COBie view maps to the COBie Component ITO definition to populate the sheet. Through this flow of information, should you need to change the location of a COBie property, you only need to modify the classification rules for that COBie property by adding a column for the property location and an additional row at the top of the classification rules list to set the classification name to the value within that column.
REPORTING – EXPORT COBIE INFORMATION TO AN XLSX SPREADSHEET
Once you have validated and calculated the COBie information within the model you are ready to export to a standard XLSX COBie spreadsheet.
- In the COBie View, click the Report button.
- Provide a location to save to and a file name and click OK.
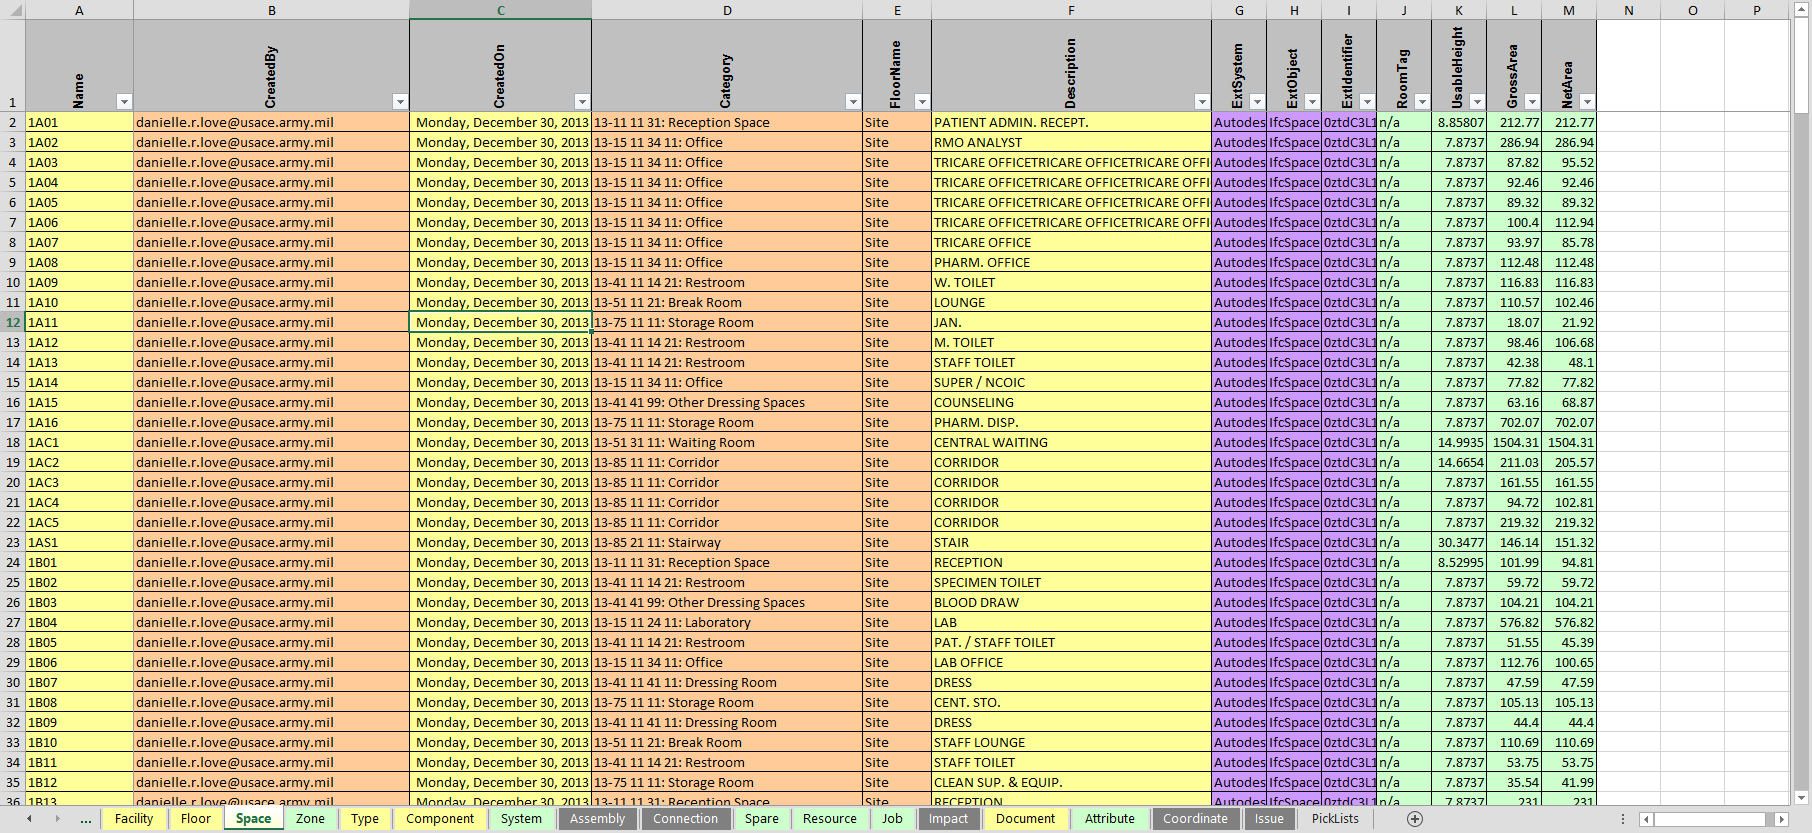
COBie Spreadsheet Exported from SMC
Once the spreadsheet finishes exporting it automatically opens in your default XLSX viewer.